|
|
|
## Demo data
|
|
|
|
|
|
|
|
This demo will need the given 3D map and ROSBAG sample data. Please download the following sample data before running the demo.
|
|
|
|
|
|
|
|
1. Download the sample 3D pointcloud/vector map data. [[link](http://db3.ertl.jp/autoware/sample_data/sample_moriyama_data.tar.gz)]
|
|
|
|
|
|
|
|
`$ wget http://db3.ertl.jp/autoware/sample_data/sample_moriyama_data.tar.gz`
|
|
|
|
|
|
|
|
1. Download the sample ROSBAG data (**LiDAR**: VELODYNE HDL-32E, **GNSS**: JAVAD GPS RTK Delta 3). [[link](http://db3.ertl.jp/autoware/sample_data/sample_moriyama_150324.tar.gz)]
|
|
|
|
|
|
|
|
`$ wget http://db3.ertl.jp/autoware/sample_data/sample_moriyama_150324.tar.gz`
|
|
|
|
|
|
|
|
[Mirror](https://drive.google.com/open?id=1ZwNQIJolJ2ogzpNprh89jCj6NocLi78f)
|
|
|
|
|
|
|
|
#### Want more data?
|
|
|
|
|
|
|
|
Once the demo goes well, you can visit [ROSBAG STORE](https://rosbag.tier4.jp) to get more data. Please also consider your contribution to this data sharing service by uploading your ROSBAG data.
|
|
|
|
|
|
|
|
## Demo run
|
|
|
|
|
|
|
|
#### Assumptions
|
|
|
|
- Autoware built from source: the demo _data_ and _rosbag_ have been downloaded into the _Downloads_ folder.
|
|
|
|
- Autoware run from docker image: the demo _data_ and _rosbag_ have been downloaded into the _shared_dir_ folder within the host. Please go to step 3.
|
|
|
|
|
|
|
|
#### Steps
|
|
|
|
1. Please checkout the release version 1.10.0 for this demo.
|
|
|
|
|
|
|
|
`$ git checkout tags/1.10.0`
|
|
|
|
|
|
|
|
2. And build it (using `catkin`) following the steps in [Source-Build](https://github.com/CPFL/Autoware/wiki/Source-Build). Source the Autoware workspace once the compilation has finished:
|
|
|
|
|
|
|
|
`$ source devel/setup.bash`
|
|
|
|
|
|
|
|
3. Create the _.autoware_ directory and extract the demo data inside.
|
|
|
|
<pre>
|
|
|
|
$ cd ~
|
|
|
|
$ mkdir .autoware
|
|
|
|
$ cd .autoware
|
|
|
|
<b>(from source)</b> $ cp ~/Downloads/sample_moriyama_* . <b>OR (using docker)</b> $ cp ~/shared_dir/sample_moriyama_* .
|
|
|
|
$ tar zxfv sample_moriyama_150324.tar.gz
|
|
|
|
$ tar zxfv sample_moriyama_data.tar.gz
|
|
|
|
</pre>
|
|
|
|
|
|
|
|
4. Run Autoware
|
|
|
|
```
|
|
|
|
$ cd ../Autoware/ros
|
|
|
|
$ ./run
|
|
|
|
```
|
|
|
|
5. Go to the _Simulation_ tab of Autoware Runtime Manager (ARM), and load the sample ROSBAG data, which is located in `~/.autoware`. _Show Hidden Files_ needs to be checked for the `.autoware` folder to be displayed.
|
|
|
|
|
|
|
|
<p align="center">
|
|
|
|
<img src="https://github.com/CPFL/Autoware/blob/develop/docs/images/demo_images/demo_load_rosbag.png" width="800">
|
|
|
|
</p>
|
|
|
|
|
|
|
|
6. Set the start time to `140`, then click _Play_ and _Pause_ just after it has started playing.
|
|
|
|
|
|
|
|
<p align="center">
|
|
|
|
<img src="https://github.com/CPFL/Autoware/blob/develop/docs/images/demo_images/demo_play_pause_rosbag.png" width="800">
|
|
|
|
</p>
|
|
|
|
|
|
|
|
7. Launch RViz through the _RViz_ button in the bottom-right corner of the ARM and load the _default.rviz_ config provided with Autoware. To do this got to _File -> Open Config_ and navigate to _Autoware/ros/src/.config/rviz/default.rviz_. _Show Hidden Files_ needs to be checked inside _Autoware/ros/src/_ for the `.config` folder to be displayed.
|
|
|
|
|
|
|
|
<p align="center">
|
|
|
|
<img src="https://github.com/CPFL/Autoware/blob/develop/docs/images/demo_images/demo_load_rviz.png" width="800">
|
|
|
|
</p>
|
|
|
|
|
|
|
|
8. Go to the _Quick Start_ tab of ARM, and load the preinstalled roslaunch scripts one by one. The scripts are located in _Autoware/docs/quick_start_. The scripts need to be enabled by clicking on the left button as shown in the image for the _Map_.
|
|
|
|
|
|
|
|
<p align="center">
|
|
|
|
<img src="https://github.com/CPFL/Autoware/blob/develop/docs/images/demo_images/demo_load_map.png" width="800">
|
|
|
|
</p>
|
|
|
|
|
|
|
|
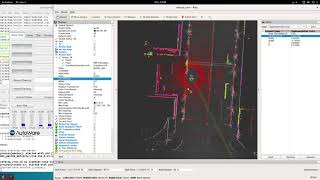
Un-pausing the simulation after starting the _Map_ will show the pointcloud map in Rviz.
|
|
|
|
|
|
|
|
<p align="center">
|
|
|
|
<img src="https://github.com/CPFL/Autoware/blob/develop/docs/images/demo_images/demo_map_shown.png" width="800">
|
|
|
|
</p>
|
|
|
|
|
|
|
|
#### Video steps
|
|
|
|
Please follow the instruction video below:
|
|
|
|
|
|
|
|
[](https://www.youtube.com/watch?v=OWwtr_71cqI) |
